Sunday, December 21, 2008

Gift Set

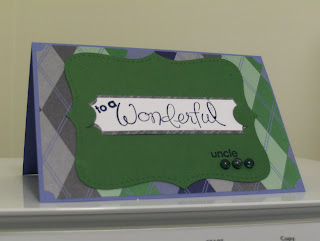
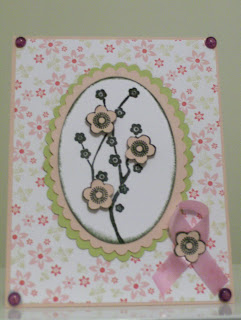
Here are some cards that I am putting together for a gift..... this is a sample of what will be in the box. In the gift set I will include envelopes for all of the cards; it will be wrapped up in a nice decorative box.


I tried to do a variety of different cards. Some have different sayings, some are blank and I also tried several different techniques. I did not use all green- these were the ones that I just finished. I am trying to include about 20 cards in the gift set.

Wednesday, December 17, 2008

SCS Blogger Group Challenge #4


HEre is my card for the Black & White Challenge through the SCS Blogger group that I belong to. It has been awhile since I posted anything; I have been so busy making the same card over and over again. All my Christmas cards! It was nice to make something different!

Recipe:
cardstock: black from SU, cardstock vellum, CTMH designer paper
stamps: Love as a tree
techniques: heat embossing

Sunday, November 16, 2008

Blogger Challenge 2&3


Here is my take on challenges 2 & 3 combined. Since I was trying to catch up from last week and I had to work on the challenge that I am hosting I decided to combine both challenges. I think combining them worked out...... hope you like!

Recipe:
Paper: Bali Breeze Designer Paper from Stampin' Up, Baja Breeze, Papertrey Ink Vintage White
Stamps: Beefafella and Sassie Suzie (sentiment)
Accessories: copics, ticket corner punch


Here is the inside:

Blogger Challenge #3


Hi All! The Blogger group that I belong to has started posting challenges on a weekly basis. This week it is my turn to host the challenge. Well, I figured I better post the challenge early (rather than being late). This week it will be a card sketch challenge. You just need to follow the layout- use whatever colors, paper, accessories, etc. Just follow the different layers. Have fun!

Saturday, November 15, 2008

Award


I got this award from Jennifer- Thank you!! I will be passing on the award in a little bit (once I figure out how to add links to the blog) LOL

Monday, November 10, 2008

SCS Blogger Challenge #1: Thanks for the Hospitality


It has taken me a few days to get back into stamping after my trip to Florida. I came up with this design for the SCS Blogger Group Challenge. I hope you all like it.....

Recipe:
Stamps: Eastern Blooms, Sassy Suzie
Paper: Bali Breeze, Certain Celery, Pld Olive, PTI vintage white, Designer Prints Pack (pink)
Ink: Old Olive
Accessories: ribbon, ticket corner punch, marvy markers

Wednesday, October 29, 2008

Merry Christmas from Bella and her Fella!


I just love all the Bella stamps. I tried a new technique that I read about on splitcoast stampers; "streaking" with baby wipes and ink. I don't have any reinkers so I used the small stampin' spots to create the background with the ground and sky. I combined two of the stampingbella stamps (winobella and beerafella) but I edited out the wine and beer!

Recipe:
Paper: real red, baja breeze, ski slope designer paper
Ink: chocolate chip, summer sun, old olive, cameo coral, palette noir
Stamps: Winobella, beerafella, and lovely as a tree
Accessories: ticket corner punch, copic markers, baby wipes

Tuesday, October 21, 2008

Birthday Card


Here i s a birthday card with my new favorite paper from Stampin' Up: Prestwick. I like it because it is masculine.

Recipe:
Paper: prestwick from SU, brocade blue, night of navy
Stamps: Birthday Whimsy and Wonderful Favorites both from SU
Accessories: embossing powder, big top notes die

Sunday, October 19, 2008

Non-traditional Wedding Card


I worked on this card a few days go; I wasn't able to post it until now because I was working on the watermark for the picture. We've had photoshop on the computer for over a year and I am finally getting around to using it- boy it's hard! I think I spent the same amount of time getting the watermark on there as I did making the card.

A co-worker is going to a wedding in November and she asked me to make a card with a beach theme. This is my interpretation: it is not really a traditional wedding card but I do like the way that it turned out. I hope she likes it too.

Recipe:
Stamps: Inspired by Nature and Fundamental Phrases
Ink: stazon and Palette Noir and several earth elements spots for the background sponging
Paper: vintage cream from Papertrey Ink and cardstock vellum from SU
Accessories: brads, wave sticker

Tuesday, October 14, 2008

Box Tutorial

Here is my first tutorial! Today I will show you how to make a decorative box out of cardstock that can hold 4 personal note cards that are 4x4 in size. First you need one pice of cardstock that is 8x11. Next score the CS at 1", 5", 6" and 10"; now rotate the CS clockwise and score again at 1" and 5".

Rotate that CS back to the original position; you are going to use a good paper of scissors and snip the scored lines on the bottom along the 1", 5" 6' and 10" score lines up to the bottom horizontal score line.

Next you are going to trim the top of the CS along the top horizontal line. Be careful, only trim up to the 6" score line (you are making the top flap that will close the box). Then starting from the right, trim along the horizontal score line again until you get to the vertical score line (you should have a 4" flap left between the 6" and 10" score lines).


Now it is time to stamp your box or add decorative paper before you assemble it. After it is all decorated (and dried!) you can assemble the box.


I used the new CS from Stampin' Up: Kiwi Kiss along with the stamp from the Embrace Life set. To add interest to the box I used the new scallop punch from SU and the slit punch to run ribbon through. Just tie off the box and Voila! you have a great gift. Don't forget to make the 4x4 personal note cards to go inside!


Friday, October 10, 2008

Happy Birthday!


I just love this new paper that I ordered from Stampin' Up! It is so difficult to find "manly" paper but I found this one in the new catty: Prestwick designer paper with Brocade Blue and Garden Green cardstock from Stampin' up. I used the new top note bigz die and the stamp set "Wonderful Favorites".

Sunday, October 5, 2008

Heartfelt Sympathy

I don't like making these cards for obvious reasons.

I used my favorite retired papers from Stampin' Up: purely pomegranate, soft sky and river rock (in-colors 08'). I had the designer paper Blue Bayou from SU. The designer paper went really well with the Eastern Blooms stamp set from SU. I used the sentiment from Close As A Memory stamp set (SU). The ink is bravo burgundy from SU.

Thursday, October 2, 2008

Best Wishes for the Bride

I love the way this card turned out. This is a card for a co-worker. She is getting married in a few weeks and we are having a bridal shower for her tomorrow after school. This is just like the red and white card that I made a few posts back. I really like the way the black, white and silver turned out.


Card Recipe:
paper: SU basic black, PTI white, SU vellum
stamps: pretty petals, MSE Wedding
accessories: brads, embossing powder, sheer ribbon, scallop punch

Tuesday, September 30, 2008

Christmas Cards


I have been working on some Christmas cards. Today I am posting two different layouts. One is similar to the one I designed last week and one is more of a winter and christmas card.

Sunday, September 28, 2008

Eastern Blooms


Today I made a card for a friend who is sick and battling breast cancer. I used the Eastern Blooms stamp set from Stampin' Up with papertrey ink paper. The pink card stock, the white and the designer paper are from PTI; the green is certain celery from Stampin' Up. I used my nesties to create a focal point for the stamp. It is difficult to tell but I popped up the three pink flowers with dimensionals to add depth to the card. I added 4 baubles from stampingbella.com. To finish off the card I took some pink ribbon and popped it up with the dimensional too.

Saturday, September 27, 2008

Monogrammed Note Cards


Today I created some monogrammed note cards and a box to store them in. Over on splitcoast stampers I have noticed that these boxes are popular and so cute....soooo I decided to give it a try and make one myself. The boxes that I have seen hold 3x3 cards but I have been making 4x4 cards- I am shocked that I was actually ale to do this. It was super easy with my scor-pal (my favorite card making tool). The box I designed will actually hold 4x5 cards ( I made it a little taller for extra room like tissue paper). I plan on making these at Christmas time for little gifts. The decorative box will hold 4 personalized cards. Next time though I will make it with coordinating papers!

Thursday, September 25, 2008

Lovely As A Tree


Here is one of the Christmas cards that I have been working on that I mentioned in the post the other day.  I used my Stampin' Up Lovely as a Tree set and heat embossed it on to artichoke colored paper from SU. I stamped the "Merry Christmas" sentiment on to PTI white card stock and paired the bravo burgundy color paper from Stampin' Up behind it.  I used the ticket corner punch to add some detail by the sentiment.  I finished the card off with the ribbon from PTI that matches the ink in the sentiment. I hope you like it!

Sunday, September 21, 2008

Fun and Fast Notes


I did not post a card yesterday because I did not like the way my card turned out.  I have been trying to design a Christmas card to send out this year but I am still playing around with the stamps.  Today I decided to create a fun and bright card using my Stampin Up paper, "Green Galore" and "Tempting Turquoise" with pink paper from the SU prints pack.  I used one of my new stamps that came the other day.  I love the Fun and Fast notes set from Stampin Up because I am able to play with my favorite copic markers! :)   I also used my oval nestabilities. I hope you like the card and thanks for looking!


Thursday, September 18, 2008

Pretty Petals


I just love the way this card turned out plus it was really easy to put together.  I have been staring at the vellum paper for months deciding what to do with it.  I stamped the vellum with the background stamp Pretty Petals from Stampin Up with my versa mark pad; then I heat embossed it with the silver embossing powder.  I paired the card with PTI red and white cardstock and added the matching ribbon from PTI.  To finish the card off I included some silver brads in the corners.  What do you all think?

Sunday, September 14, 2008

Get Well


Here is a new post for today.  I have a co-worker who isn't feeling too well and I thought that Bootabella might cheer her up.  For the card I chose Stampin Up old olive and summer fun paper along with old olive designer paper.  I colored Bella with my copic markers again.  I have been trying to learn the blending techniques with the copics but I am not quite there yet. All the sites keep telling me to Practice, Practice, Practice!!

Saturday, September 13, 2008

A Birthday Card for Sawyer


Hi out there!  I made this birthday card for my goddaughter Sawyer.  It was her 9th birthday the other day.  I chose real girly colors for her.  I LOVE the Bella Stamps; so I inked up Billboardabella in adirondack espresso and stamped her onto PTI white cardstock. THen I colored her with  my new Ciao Copics markers.  Next I picked the paper colors that I wanted to use: I went with Stampin Up perfect plum, pale plum and the Designer Paper prints pack from SU.  I like the double sided dp paper and I wanted to make sure that both sides of the paper showed in the card.  I used the scor-pal to crease the paper over with a crisp look. I used the merci stamp set to stamp the image in the background with my versa mark pad.  I also stamped the flower from the  friendship blooms set and added a bauble.  

Sawyer did  not believe that I made the card ( I guess that's a compliment from a 9 year old), it took some convincing.  I offered to have a card making demonstration and project session with her Brownie Troop- she was excited about that!  The teacher in me would love to share the joy of stamping with them.